Update: iNavCalc V3.0 mobile app now released
Update: iNavCalc now includes NAVCOM frequencies
Update: iNavCalc now includes NOTAMs
Update: all described functionality now available via mobile app...
First, a big thank you to Prestwick Flight Centre for looking after our Bulldogs in the lead-up to the RAF Leuchars airshow where we will proudly exhibit them in the static display. We positioned the aircraft at Prestwick in August so we can maximize our chances of actually getting to Leuchars on 14 September 2012, given the vagaries of the British autumn weather (EGPK being considerably closer to EGQL than either of our home bases EGNS and EGSF).
I now need to plan the (VFR) route from Prestwick to Leuchars. I'm going to use a mix of old and new technologies, demonstrating the power of iNavCalc (and it's interoperability with other apps) along the way. Here goes...
STEP 1: Draw a line on the map
Call me old-fashioned, but I find the very best way of panning a route is to have the physical chart spread out on the table in front of me. In this case, the UK CAA 1:500k chart for Scotland. Also, I will need this the ultimate nav reference in the cockpit, in case the GPS fails or gets messed-up by jamming trials (an albeit rare but nevertheless possible occurrence). In case the weather is sub-optimal, I want a reasonably direct route which avoids Glasgow and Edinburgh Controlled airspace, avoids the most significant terrain, and which gives me some practical diversion opportunities along the way -- just in-case the weather closes-in. Inspecting the map, here's the set of waypoints I've come up with.| Navaid | Altitude | ||
| 1 | EGPK (departure) | ||
| 2 | Road junction, south of Kilmarnock | GOW188/16 | 2000 |
| 3 | Strathaven microlight strip | GOW139/16 | 2500 |
| 4 | EGPG (overfly) | 2500 | |
| 5 | Road junction west of Dunblane | PTH237/26 | 2500 |
| 6 | EGPT (overfly) | 2500 | |
| 7 | EGQL (destination) |
Importantly, I've included the radial(magnetic)/range(nm) of each waypoint from an appropriate radio navaid: again, in-case the GPS fails. I simply eyeball these from the chart using a protractor and a ruler (the CAA chart conveniently has magnetic compass-roses centred on each VOR, making the task of eyeballing the radials very simple). I've also shown nominal altitudes (in feet) which avoid CAS and terrain, again, derived from inspecting the chart.
STEP 2: Generate a PLOG ("Pilot's navigation LOG")
Let's recap. So far, I've used very old technology (map, ruler, protractor). With these, I've got a sensible route drawn on the chart which I will use in the cockpit as an essential nav reference if my GPS and radio navaids fail. I now want a PLOG which I can print out and use in the cockpit to monitor my progress with regards time, fuel (primarily) and diversion-planning. I will also use this PLOG (in combination with a stopwatch and chart) as my primary nav reference in the event that my GPS and navaids fail.
Rather than doing the calculations by hand (the old-fashioned way with whizzy-wheel etc), it is appropriate to now switch to using new technology. Nothing very fancy, however -- just my Samsung S2 Galaxy Android smartphone equipped with email. No other apps required.
Specifically, I now send the following email (via my smartphone):

You can see that I've simply specified the waypoint ICAO names and/or navaid radials from the above list, separated by spaces, on the email subject-line (i.e., Subject: EGPK GOW188/16 GOW139/16 EGPG PTH237/26 EGPT EGQL). That's it. A few seconds later, I receive the following response with the following attachments:

The first of these file attachments (named "ROUTE_..."), I'll discuss later. Let's focus on the second (named "PLOG_...") which contains the desired PLOG (our goal in this step of the planning). I'll extract and describe the pertinent sections from the PLOG PDF document below.
The first section is the FLIGHT SUMMARY, shown below:

This contains the key information summarising the flight at-a-glance. Importantly, it shows that as long as I depart on full tanks (32 UK gallons in my Bulldog), I will have plenty of margin (approximately 3 hours / 250 nm) in case I need to divert. It also shows that the expected flight time is 48 mins. Given that RAF Leuchars has specified a precise arrival slot time (12:20 local), this suggests I should aim to depart Prestwick at 11:20 local, giving 10 minutes margin (can always hold for 10 minutes if I arrive early).
The next section in the PLOG PDF doc is the NAVIGATION page, as shown below:

This contains the essential navigation information required for conducting the flight (headings, timings, fuel consumption for each leg). This would be essential for continuing to fly the route in the event of failure of GPS or navaids. Winds aloft are automatically retrieved from internet-based forecasts (valid at the point in time when the PLOG email was sent) and accounted for in the heading computations. Also, importantly, the "ETA/ATA" column has space for writing in (by hand) the actual times observed in flight so that the ETA's can be updated accordingly. Finally, the "Diversion available" column gives the (still air) range and endurance available from each waypoint along the route, should it be necessary to consider a diversion at any point along the way.
The next section in the PLOG PDF doc is the WAYPOINT DETAILS section, as shown below.

This contains the coordinates (latitude and longitude) of each waypoint, expressed in all common formats. This is useful for transcribing the non-standard waypoints into a built-in GPS device such as my Garmin GNS 430 (which, being IFR-rated, does not permit automated electronic upload of user data). Also displayed is the magnetic variation at each location.
The next section in the PLOG PDF doc is the ALTIMETRY section, as shown below.
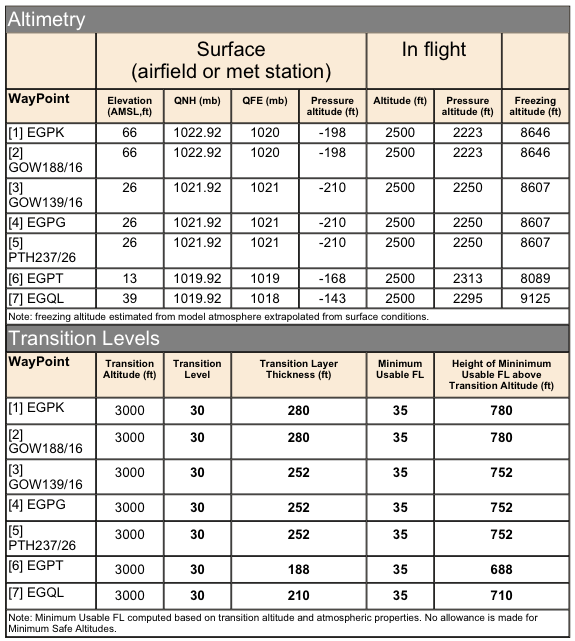
This shows the QNH (and QFE) computed for each waypoint location, computed via MET reports automatically retrieved from the internet (valid at the point in time when the PLOG email is sent). Importantly, the "Freezing altitude" column shows the (approximate) altitude when the outside-air-temperature drops to zero degrees centigrade. The lower half of the page contains the TRANSITION LEVEL computations (note: requires the user to specify the appropriate transition altitudes along the route, defaults to 3000ft if not explicitly specified).
The next section in the PLOG PDF doc is the PERFORMANCE section, as shown below.

This shows density altitudes (at ground level and at flight altitude) computed for each waypoint location, using data from MET reports automatically retrieved from the internet (valid at the point in time when the PLOG email is sent). This is useful for assessing the expected engine performance (especially important for takeoff and climbs). The lower half of the page shows the TAS (and Mach Number) along the route (for the user-specified IAS) computed for each waypoint location, using data from MET reports automatically retrieved from the internet (valid at the point in time when the PLOG email is sent).
The next and final section in the PLOG PDF doc is the SUNLIGHT section, as shown below.

This shows the sun position along the route, useful for determining if the given part of the route is in daylight or darkness. If daylight, the sun direction (as viewed from the cockpit) is shown, enabling the assessment of the potential for glare (and thus preparing for the associated hazards). The computations are based on the user-specified departure date/time (defaults to the point in time when the PLOG email is sent, if unspecified). The lower half of the page shows the sunrise, sunset, and hours-of-daylight for the date of the flight, computed for each point along the route.
STEP 3: Check the weather
Now let's turn to the third of the email file attachments (named "MET_..."). This is a PDF document containing the TAFs and METARS along the route, automatically retrieved from the internet, as shown below.
You can see that the MET stations in the report are automatically chosen based on their proximity to the route. There is no need to manually specify them.
STEP 4: Save the route
Since I am pre-planning this route a couple of weeks before the date of the actual flight (on 14 September 2012), I want to save it so I can recall it on the day, and, more importantly re-compute based on the then-current weather.
It is simple to save the route in the FlyLogical database by sending an email as follows:

Note that the route specified in the previous email will be remembered (since I haven't updated it with a subsequent PLOG email request with different waypoints in the meantime). Now I am simply requesting that this previously-defined route gets saved in the database under the name "PRESTWICK TO LEUCHARS VIA PERTH". A few seconds later I received the following response:

The URL contained in the email ( http://bit.ly/PQXfi1 ) is a link to the saved route in the FlyLogical database.
STEP 5: Re-compute PLOG on the day of flight
Let's recap. So far, the only actions I've taken were to (i) draw my desired route on my map; (ii) send a simple email to create a PLOG based on my desired waypoints; (iii) send a follow-up email requesting to save the route to the FlyLogical database for later use. Everything else has been done for me by the iNavCalc servers.
Now let's imagine we fast-forward to the 14 September 2012, the day of my flight to Leuchars. I want to re-compute my PLOG given current weather. To do so, I could simply carry out STEP 2 again (i.e., re-specify the waypoints on the email subject-line).
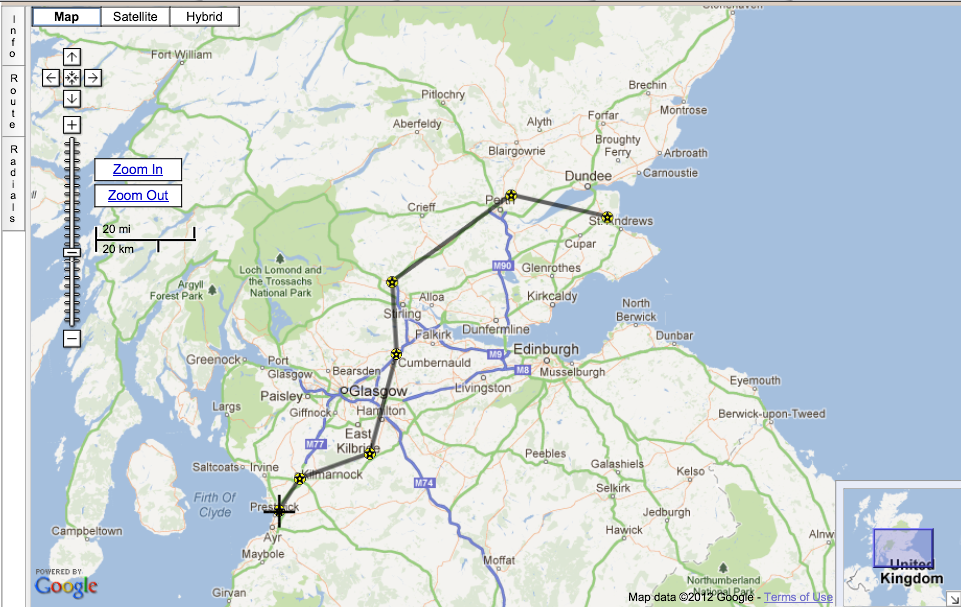
Alternatively, I can retrieve the previous email response and click on the link ( http://bit.ly/PQXfi1 ) to open the iNavCalc web-app (in the web browser on my smartphone, iPad, or PC etc), and load the previously-saved route into the GoogleMap interface, as shown below:
Opening the "Route" tab (left-hand-side) and clicking the "Get detailed PLOG..." button, opens a window from which the re-computation of the PLOG can be triggered, as follows:

Clicking the "Get PLOG by email" button will generate a PLOG delivered by email, as in STEP 2.
The "PLOG_....pdf" (and "MET_....pdf", though less-compelling) file(s) from the email attachment can be printed-out for carrying on-board. I can also archive them on my smartphone (and/or iPad). Note: I find the Kindle app (from Amazon) to be particularly good for this, on both my Android phone and my iPad. I can simply email the PDF files to my Amazon Kindle account, then sync them to my portable devices, free-of-charge since the files are already in PDF format and do not need to be converted (for which Amazon would charge a small fee). I also use this approach for other PDF documents such as checklists, approach plates, airfield plates, and whatever other useful references I wish to carry along without having to carry piles of paper.
STEP 6: Comms frequencies, airfield plates, approach plates
Now that I have my route and PLOG computations ready for flight, I need the list of relevant comms frequencies (radios and navaids), airfield plates, and approach plates (in case I find myself in IMC and have to carry out an IFR approach). In my opinion, the best and most comprehensive source for these is Jeppesen JepView since they provide complete VFR and IFR coverage. I therefore prepare a Jeppesen trip-pack for the route, print it out "as PDF" (using the excellent and free Bullzip PDF printer app), and archive it (via the Kindle app) on my smartphone and iPad. I also take a physical printout of these just in case. However, I also have all the relevant frequencies within easy reach via my Garmin 430. They are also printed on the UK CAA chart. So, plenty of redundancy in this regard.
STEP 7: NOTAMs
My favourite source of NOTAMs for the UK is via the metutil.appspot.com website, a sample screenshot as shown below.

The reason I find this so useful is that it provides an at-a-glance view of the whole country, and I can zoom-in on the areas of interest, not just my nominal route. The SkyDemon iPad app (more on this in a later post) also has a powerful (and visually slick) NOTAM facility, but it is limited to the route in question, and it is therefore not very convenient for gaining a general overview e.g., when considering diversion pre-planning, etc.
Hello, I am using FlyLogical since years, I really like the program, as it also keeps you "in touch" with the basics, still with a lot of comfort.
ReplyDeleteI have noticed that since quite a while Automet is not available in the plog. Is it just bad luck on my Plog requests or any reason behind it...?
İsmetpaşa
ReplyDeleteKnidos
Sanayi
İhsaniye
Bostanlı
3K7K5T
Adana
ReplyDeleteElazığ
Kayseri
Şırnak
Antep
TU610
https://titandijital.com.tr/
ReplyDeleterize parça eşya taşıma
trabzon parça eşya taşıma
zonguldak parça eşya taşıma
kayseri parça eşya taşıma
OSG
5D381
ReplyDeleteSakarya Şehir İçi Nakliyat
Manisa Lojistik
Bitmex Güvenilir mi
Sui Coin Hangi Borsada
Sakarya Parça Eşya Taşıma
Bitlis Şehirler Arası Nakliyat
Bayburt Parça Eşya Taşıma
Bitranium Coin Hangi Borsada
Mersin Şehirler Arası Nakliyat
22F79
ReplyDeletebalıkesir ücretsiz sohbet
en iyi görüntülü sohbet uygulaması
elazığ bedava sohbet
aydın canli goruntulu sohbet siteleri
denizli telefonda rastgele sohbet
adıyaman ucretsiz sohbet
kilis sesli sohbet odası
diyarbakır sesli sohbet uygulamaları
kütahya parasız sohbet siteleri
5830C
ReplyDeletemanisa en iyi rastgele görüntülü sohbet
kırklareli canlı sohbet
bilecik canlı sohbet siteleri ücretsiz
Bingöl Chat Sohbet
tunceli görüntülü sohbet
çorum telefonda rastgele sohbet
Giresun Canlı Ücretsiz Sohbet
kütahya görüntülü sohbet yabancı
sohbet odaları
0B4B4
ReplyDeleteBitcoin Nasıl Üretilir
Bitcoin Kazanma
Referans Kimliği Nedir
Mith Coin Hangi Borsada
Coin Nasıl Alınır
Tiktok İzlenme Satın Al
Spotify Dinlenme Hilesi
Telegram Abone Hilesi
Bitcoin Oynama
DAF97
ReplyDeleteChat Gpt Coin Hangi Borsada
Bitcoin Kazanma
NWC Coin Hangi Borsada
Kripto Para Nedir
Bitcoin Kazanma
Görüntülü Sohbet Parasız
Lunc Coin Hangi Borsada
Bitcoin Kazanma
Youtube İzlenme Satın Al